cahunter805
Well-known member
- Joined
- May 27, 2014
- Messages
- 2,579
I agree with others above. I’m sure a local shop could bead blast it all to match for not much if you don’t want to hassle with sending it back.
Follow along with the video below to see how to install our site as a web app on your home screen.
Note: This feature may not be available in some browsers.


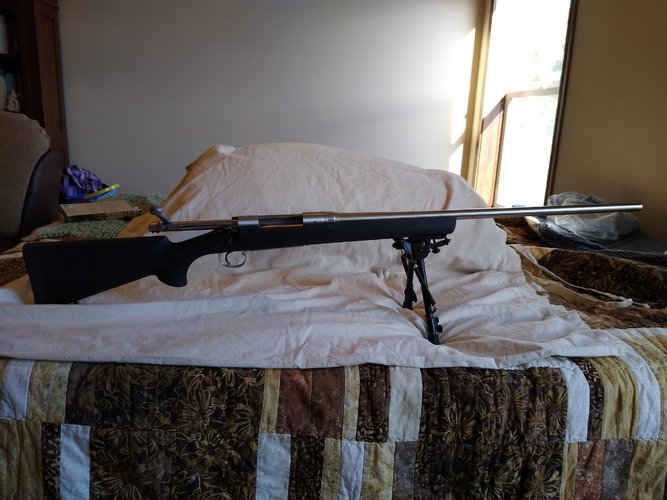
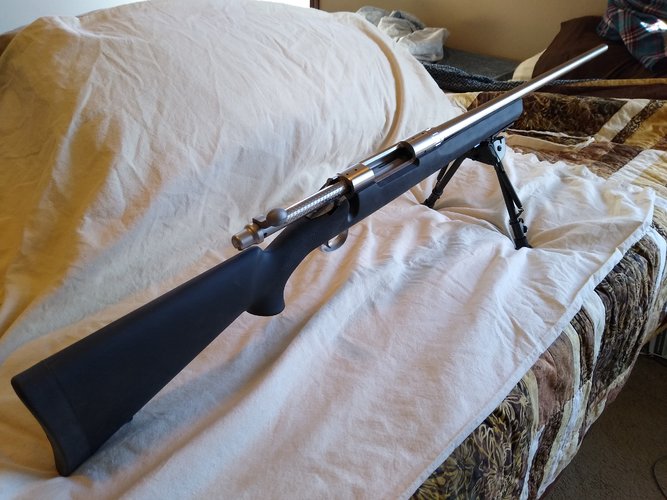
Here it is:
View attachment 165520View attachment 165521
280 Ackley Improved.
I decided not to worry about the shiny finish. I figure I can always put camo tape on it if I decide its bothersome. But anyway, I've been sick with COVID lately, but last night I just couldn't take it anymore, so I took some ibuprofen and worked on it between coughing fits.
It was an interesting process. I went very slow. I've watched about every youtube vid that exists on the subject and had notes. Some do the install using a barrel vise, some did it using a standard bench vise. One of the tools I'd invested in was a barrel vise so I used that, however, after having done it I do think it would have been simpler to use a bench vise. Criterion had one of the videos I watched, if you decide to go this route, I'd recommend you do it exactly how they did - they used a bench vise and even recommended against using a barrel vise.
You'll also certainly need an action wrench, a barrel nut wrench, headspace gauges (go and no-go) and a tool to align the recoil lug (there's more than one type, I used the NSS Taper-Loc attachment that goes on the action wrench). And a torque wrench. But yeah, unless you're going to have to remove an old barrel from the receiver you want to use, save your money on the barrel vise and just use the shop vise in your garage.
I was pretty nervous about headspacing it correctly. Using the gagues, I checked and double checked, and checked a dozen more times. It was actually easier than expected, but the complicated part was holding the receiver right where it needed to be while using the barrel nut wrench and torque wrench to tighten down the nut to 45-50ft/lb. That operation needed 3 hands, but I eventually got it. Obsessively rechecked the headspacing again and it was good. I had a barreled action.
The rest was a matter of re-installing the ejector (it needs to be removed to properly set the headspacing). Dropping in the Timney trigger, screwing in the metal, and putting it in the stock. Everything I used, parts and tools, came from either Midway USA or Northland Shooters Supplies.
Might take a minute. I've had good luck with Hornady dies, but I can't find the custom grade die sets I'm familiar with anywhere. Im considering springing for a Redding set, I've read good things about them and they seem to have some similar features to the Hornadys. Brass is a little scarce too.Can't wait to hear back on how it shoots!
Actually I'm not completely sold on the stock I put it in. It's a Hogue Overmolded I had on a different rifle a while back. Good pilar bedded stock, but the channel is a tad small for the barrel to free float. It free floats a standard factory sporter barrel just fine, but the one I ordered is a Heavy Sporter. There is a little contact in the forend I didn't count on. I might try to sand it down or I might just put it in another.Good looking platform...like the looks of that grip.
Looks great!Here it is:
View attachment 165520View attachment 165521
280 Ackley Improved.
I decided not to worry about the shiny finish. I figure I can always put camo tape on it if I decide its bothersome. But anyway, I've been sick with COVID lately, but last night I just couldn't take it anymore, so I took some ibuprofen and worked on it between coughing fits.
It was an interesting process. I went very slow. I've watched about every youtube vid that exists on the subject and had notes. Some do the install using a barrel vise, some did it using a standard bench vise. One of the tools I'd invested in was a barrel vise so I used that, however, after having done it I do think it would have been simpler to use a bench vise. Criterion had one of the videos I watched, if you decide to go this route, I'd recommend you do it exactly how they did - they used a bench vise and even recommended against using a barrel vise.
You'll also certainly need an action wrench, a barrel nut wrench, headspace gauges (go and no-go) and a tool to align the recoil lug (there's more than one type, I used the NSS Taper-Loc attachment that goes on the action wrench). And a torque wrench. But yeah, unless you're going to have to remove an old barrel from the receiver you want to use, save your money on the barrel vise and just use the shop vise in your garage.
I was pretty nervous about headspacing it correctly. Using the gagues, I checked and double checked, and checked a dozen more times. It was actually easier than expected, but the complicated part was holding the receiver right where it needed to be while using the barrel nut wrench and torque wrench to tighten down the nut to 45-50ft/lb. That operation needed 3 hands, but I eventually got it. Obsessively rechecked the headspacing again and it was good. I had a barreled action.
The rest was a matter of re-installing the ejector (it needs to be removed to properly set the headspacing). Dropping in the Timney trigger, screwing in the metal, and putting it in the stock. Everything I used, parts and tools, came from either Midway USA or Northland Shooters Supplies.